
🛠️ How to Install a Hayward Skimmer into a Soft-Sided Intex Pool
Share
Get better water circulation and less floating debris with a pro-style upgrade.
If you own a soft-sided Intex pool, you know the stock skimmer can be... underwhelming. It floats around, clogs easily, and doesn’t always catch leaves or bugs. That’s where the Hayward wide-mouth thru-wall skimmer comes in.
Yes, it's designed for hard-sided pools—but with a little DIY spirit, it can be installed on an Intex pool with great results. Here’s how.
⚠️ Important Note:
This installation requires cutting your pool wall. Proceed only if you're comfortable with irreversible modifications. That said, thousands of DIYers have done this successfully—and the water clarity improvement is worth it.
🔧 What You’ll Need:
-
Phillips screwdriver
-
Utility knife or sharp box cutter
-
Silicone sealant (pool safe)
-
Straight edge or ruler
-
Marker or pencil
-
Backer board (optional for reinforcement)
📍 Step-by-Step Installation Guide:
1. Choose the Skimmer Location
-
Pick a flat section of the pool wall, away from the metal frame posts.
-
Position the skimmer near the top water line, but low enough to stay submerged.
-
Make sure it’s directly across from your return jet for optimal flow.
2. Drain the Water Below the Cut Line
-
Drain the pool until the water level is at least 2–3 inches below where the skimmer will sit.
-
Make sure the pool is completely dry where you’ll be installing.
3. Mark Your Cutout
-
Use the skimmer faceplate as a template. Trace the inside edge for your cutout and the outside edge for screw holes.
-
Double-check your alignment—once you cut, there’s no going back!
4. Cut the Liner
-
Carefully cut along your inner traced line using a sharp utility knife.
-
Don’t rush—clean edges make sealing easier.
5. Apply Silicone Sealant
-
Apply a generous bead of pool-safe silicone around the gasket and skimmer opening.
-
Sandwich the pool wall between the front faceplate gasket and rear housing gasket.
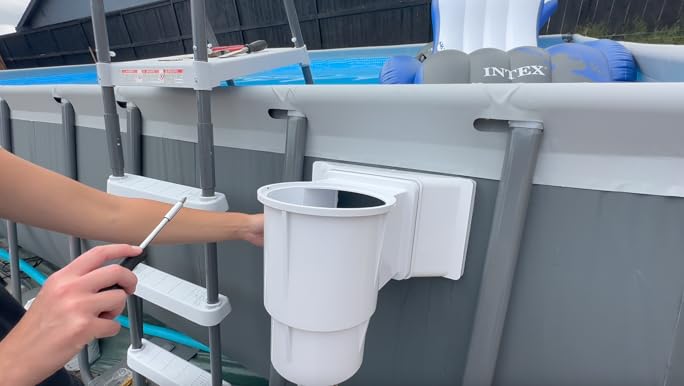
6. Mount the Skimmer
-
Align the skimmer over your cutout.
-
Insert screws and tighten evenly in a crisscross pattern to avoid warping.
-
Let it sit for 12–24 hours to fully cure.
7. Reconnect Hoses
-
Attach your return hose and any additional plumbing.
-
Fill the pool back up and inspect for leaks.
🌀 Why Upgrade to a Hayward Skimmer?
-
Better water circulation
-
Stronger suction = cleaner water
-
Holds more debris before clogging
-
Stays fixed in place—no more floating skimmer frustrations
✅ Pro Tips:
-
Use a backer plate (cut from a plastic cutting board or sheet of Plexiglas) inside the pool wall to strengthen the area.
-
Periodically check your screws and silicone for wear.
-
Don’t overtighten screws—too much pressure can deform the soft wall.
💬 Final Thoughts:
Installing a Hayward skimmer into a soft-sided Intex pool takes a little courage and a sharp utility knife—but the payoff is clear, sparkling water and a way more efficient cleaning system. If you're tired of skimming leaves by hand or chasing a floating skimmer basket around the pool, this upgrade is 100% worth the effort.